Sunday, September 23, 2012

From Brassy to Classy-Transforming our Master bath with paint

Painting the Gold shower enclosure and faucets kicks off the master bathroom renovation!!


One of the major renovations we have going on right now is almost finished!!

I'm going to pretend that we don't have 3 other major projects going on and focus only on the bathroom.

Why?

Because I'm feeling quite overwhelmed by the labor intensive work ahead on the stairs, kitchen cabinet makeover and finishing of our basement.

And because we're leaving for a cabin getaway in the smoky mountains so no progress on the house will be happening. Might as well revel in the projects that have been completed instead of worrying about the projects yet to be finished.

Lets get started by taking a peek at the bathroom before:

Shower and His side:

Tub and Her Side


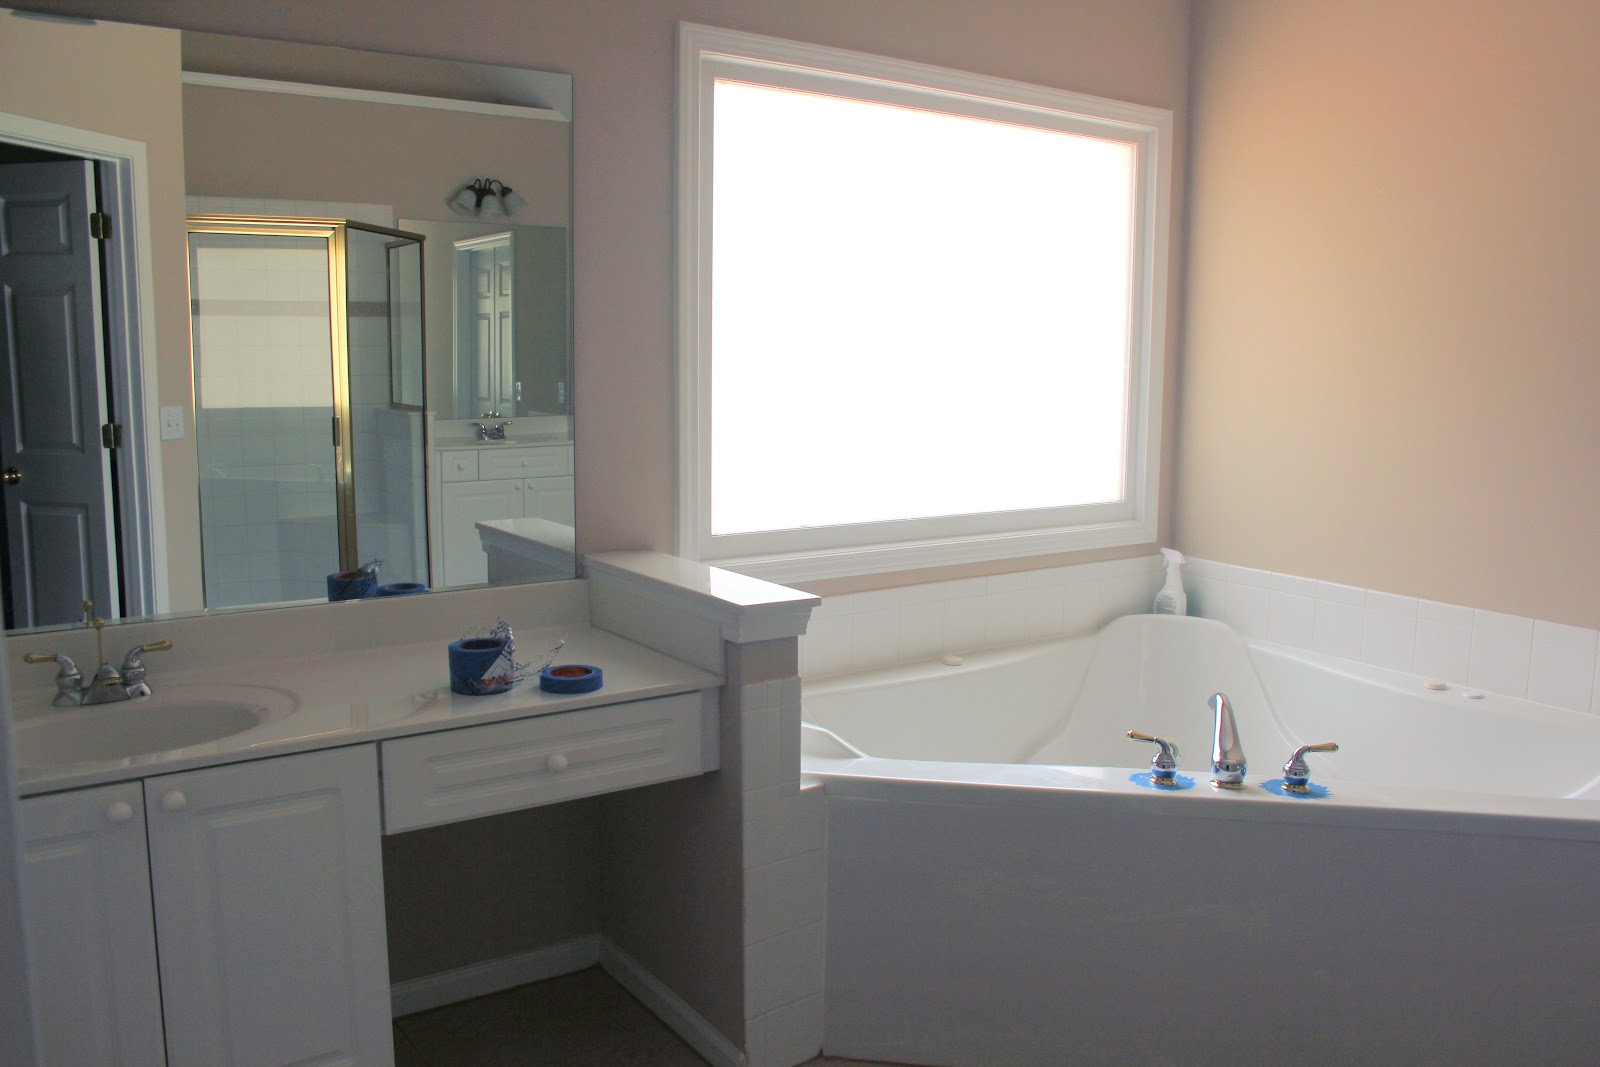
After a ton of taping and covering and a few cans of Oil Rubbed Bronze spray paint.

Ta-Da!!


Amazing what a little elbow grease and spray paint can do isn't it?? I'm in love!! Can't wait to show you the next transformation that I accomplished with  paint on those countertops, yep, I painted them a  faux granite! I'll share those details tomorrow!!

A little side by side action to fully see the impact!!


I followed Kristi at Addicted to Decorating's tutorial to the letter and LOVE LOVE LOVE the results and highly suggest if you are going to attempt this project you follow her lead :)

Addicted to decorating Painting faucets and shower enclosure tutorial

This project was certainly a labor of love and took FOREVER. The hardest part I encountered was removing all of the caulk around the shower enclosure. The tile soap dish is the only casualty so far, the paint peeled right off after a wash cloth was left to dry on it.

This project cost about $80 but made a huge impact

Spray Paint: $7.96/can- used 4 cans
Automotive Primer: $6.99- used 2 cans
Tape: ~$5
Brown Paper roll: ~$12
Plastic sheeting: ~$8
Sand Paper: ~$3
Steel wool: ~$5
*the last 5 item costs are appoximates

More to share tomorrow!!

-Danielle

Tuesday, September 18, 2012

IKEA Tarva turned Knock Off Anthro Ordinal Dresser

Want to see how I turned an Ikea Tarva dresser into Anthro's Ordinal dresser??


As I continue to work on the stair transformation I'm going to share another knock off idea I have sitting in my entryway.

The entryway table I shared a few days ago was purchased to live right inside the front door but I may or may not have went shopping and forgot (err never measured) the space between the wall and column, the table was too long, so it was moved to sit beside the staircase.

As I sat in the school pick up line one afternoon killing time, checking emails I clicked on the email from Anthro and was clicking around to see what they had to offer. I couldn't believe the price they wanted for the little 3 drawer Ordinal dresser but that's not unusual for me, I'm cheap frugal and gasp at most major retailers pricing. However I couldn't help thinking about those cute little numbered drawers.

 
Enter pinterest and a quick search of DIY anthro dresser.
 
Voila!
 
I had found the most amazing makeover from East Coast Creative Blog (formerly The Real Housewives of Bucks County)


Well I wasn't lucky enough to have an old dresser in the garage and I needed something that would fit in the space inside the front door.
 
So AFTER measuring the area I wanted to fill (I'm learning, I'm learning!!) and a quick trip down to IKEA I came home with the perfect dresser to makeover.
 
I love that the Tarva dresser is 3 drawers and unfinished. The $79 dollar price tag was so much better than Anthro's $998 price, SCORE!!
 
Plus, it fit! Thank you handy measuring device ;)


Gave it a quick coat of stain with Minwax Special Walnut
 
 
I traced out a stencil I had on hand and then hand-painted each number on.
 
 
Waited for the paint to dry and gave each number a super light sanding just to tone down the black paint.
 
 
And now she's all ready to stand her ground at the front door.
 
 
This area is next on the Holiday decorating hit list so you'll be seeing it again soon and hopefully in better light! Oh and yep, that's where the owl I stole borrowed for the Halloween display came from.
 
Thanks for stopping by!
 
-Danielle

Sunday, September 16, 2012

Chain of events DIY style

Isn't it funny how one project inevitably leads to so many more? Or does that only happen in our house?

One of the biggest changes we made to the house was hiring a crew to refinish the hardwood to a darker stain.

Before:


After:

 
We went with Minwax Dark Walnut and even though it wasn't as dark as I had originally hoped for it made a huge difference in the warmth of the house and I'm so glad we decided to do this BEFORE we moved in because it was a messy, stinky process.

Little did I know that changing the floors would cause my To-Do list to grow by leaps and bounds.

After the floors were refinished the banisters were just begging me to stain them to match the purdy brown floors every time I walked in the front door.

Of course once the floors were gorgeous and the banisters were a beautiful chocolate goodness (the front banisters anyways, I have the entire upstairs to finish) I see the centsational girls staircase reveal and can't stop dreaming of the carpet being ripped out and having dark wood treads and bright white risers. 

Well guess what?!? It's in the works!! YIPPEEE!!

 
I was about to head out for a run and was sitting on that bottom step putting my shoes on and while looking down starting thinking, "hmmm, I wonder what's under this carpet? Could we be lucky enough to have wood stairs in good shape under there?? Maybe I'll just pull up a little corner and take a peek."
 
So I pulled a little corner and was happy to see the riser flush to the side trim and the bottom tread, pleased with that fact, I pulled a little further and saw a wood tread and the riser set all perfect and snug. Hollered for the hubby to come take a peek and then tucked it back in knowing full well we have 800 other projects to finish up before I should start on this one. Well the hubby thought we should add another project ;)
 
 
Came home and the hubby had gone and done this!!
We are lucky to have 2 staircases to go upstairs so we're doing the front staircase first and then we'll work on the other side, the landing and the final 4 stairs to the top.
 
In addition to all the entryway changes because of the new dark floors, I'm now pining over all the gorgeous white kitchen cabinets because the dark floors and dark cabinets are not doing anything to inspire me to cook.
 
I think the hubby has finally come out of 'The Dark Side' where those stained cabinets are concerned after showing him this gorgeous white cabinet transformation and evolution of style tutorial.
 
Can't wait to share that change, it's going to be HUGE!! Stay tuned, it's already starting...
 
-Danielle


Thursday, September 13, 2012

How to DIY 2 Pottery Barn Skull Vases for under $15!

Love the PB Skull Vases but not the price? Are you bummed you missed out on them and they're no longer available? No worries!! We're going to make our own! Read on and you'll be displaying these fantastic vases in no time!

 
All supplies were purchased at Michaels and cost a grand total of $13!! (I had the spray paint on hand but I'm including the Michaels price for the same spray paint I used)
 
First a look at Pottery Barns version:


These are no longer available on their website but that's okay because we're about to make our own!!
 
At a fraction of the price too!
 
Now a little look at my version:


 Ready to make your own??
 
First let's take a look at what you'll need


2 glass vases are on sale this week at Michaels for 2.99 each
2 styrofoam skulls are $1.04  ($1.49 + 30% off)
Krylon spray paint is on sale for $4.99 this week at Michaels. (I thought I'd like more of a tonal color and tried 2 different colors but the final coat was all Ivory as I just liked it better)
 
If you're lucky and your Michaels happens to be right next door to a Home Depot, Lowes or Walmart you might want to run in and get the paint from one of those stores as they run about a $1 cheaper.
 
 Okay so we've got all we'll need (oops forgot the glue!!) Use what you have on hand, that's what I did and why I forgot it, sorry!
 
Take the glass vases and give them a quick, light coat of spray paint
 
 
This was the greyish color and I just didn't love it but that was okay because it's just a base coat :)
 
 Let the vases dry.
 
While they're drying, grab a knife to cut the face off of each skull (that sentence just sounds really really wrong LOL)
 
 
You'll end up with 2 creepy faces staring at you...
 
 
Now an extra little step I took that I'm not sure made one iota of a difference, was to sort of scoop some of the styrofoam out of the center of the face like so:
 
 
After your vases have completely dried, (or if you're impatient like me, *mostly* dry) grab your glue to attach the foam skulls to the vases.
 
 
Allow the glue to dry
 
Almost DONE and it's been so easy thus far. Guess what? The last step is just as easy!
 
 
Bring the vases back out to your painting area and give them another light coat. That's it!
 
You now have your very own skull vases for a fraction of the cost and all the satisfaction of making them with your super savvy DIY skills. Go on with your bad self :)
 
 
See that blob in the left skull eye? That's where I scooped out just a little too much foam and the glue poured out. No biggie, I think he looks just a little creepier that way. He's our very own 'One Eyed Willy' We may or may not be "Goonies" fans in this house ;)


They certainly steal the show and I just love how they turned out!
 
I debated with myself about adding some depth with a brown or black paint watered down and dabbed on but decided to leave them as is. For now.
 
 
I hope this tutorial was helpful
 
Remember you can always keep costs even lower by using a paint you have on hand or vase/ceramics you already own.
 
-Danielle
 
Linking up at:

Photobucket    

HookingupwithHoH 
Home Stories A2Z
Skip To My Lou


Wednesday, September 12, 2012

Entry table all decked out for Halloween

It's my most favorite time of year!!

The morning and evenings have a slight chill in the air, mid-day warms up to the high 80s but the humidity is gone. (if you also live in the south you know how nice the missing humidity is)

The changing weather always puts me in the Halloween decorating mood so I've been pinning and pinning inspiration ideas and pouring through all the magazines arriving in the mail.

I always swoon over the Pottery Barn Halloween spreads but know the budget doesn't allow me to go buy each piece and replicate the design.

So without further ado I present our entry tablescape all done up for Halloween (on a very small budget)

IMG_7232

 
IMG_7241
 
The bats go up the little stair wall. Bats are Martha Stewart line from Michaels I got on sale for $3.49

IMG_7239
 
 
 The black frame is a thrift store find for $1.19, haunted house felt came from the The Dollar Tree for you guessed it $1.

IMG_7221
 
stole borrowed the books and owl from another room. The books came from Goodwill once upon a time and the owl was a 75% clearance from Michaels.
 
 
IMG_7210

These vases are a DIY PB knock off I'll share the tutorial tomorrow so be sure and check back! They were super easy and CHEAP. All supplies from Michaels too! No hunting down rare or hard to find pieces to re-create this design ;)

IMG_7215
 
Black bird from Garden Ridge $1.99, skeleton hands are meant for the yard but I just love them! They were 3.99 at Garden Ridge. The glass vase was a thrift store find for 1.99 and it's just filled with white round candy.

IMG_7225

This big ole creepy spider was another Home Goods purchase at $3.99

IMG_7216
 
Vase filler in the left hand skull vase is a black boa and two googly eyes glued to foam balls attached to wooden skewers, super easy to make and I'll be sharing a tutorial making quite a few of those as I have some super cute wreaths in the works right now ;) Filler in the other vase is the twigs from a cinnamon broom (I know cinnamon isn't a Halloween scent but it doesn't make me love it any less)

IMG_7200
 
Hope you've enjoyed my Halloween tablescape! I keep walking by just to sneak a peek!!

Make sure and stop by again tomorrow for the vase tutorial, these bad boys were listed at $109 from Pottery Barn and you can buy all the supplies needed to make your own for a grand total of $13 for 2 and that includes the spray paint!! If you're like me and hoard paint you can make these bad boys for a whopping $8

-Danielle

Halloween Mantels

Tuesday, September 11, 2012

Welcome Welcome Welcome

Just a quick introduction as I start this new blogging journey! I am Danielle, I am married to the love of my life ,Greg, we are parents to 2 pretty awesome kiddos, Samantha and Thomas and all 4 of us are owned by our German shedder I mean shepherd, Karina.

We bought our very first house after 8 years of marriage and many many moves in between. (eh-hem 9 moves through 6 different states)

Join me as I share the big and little changes I make/have made (we've been here a year now) to transform our first home into our forever (a girl can dream right?) home.

Now a quick before we moved in tour:
Please excuse the listing pictures as I didn't even think to take them before moving in.

Front of the house


As you enter

Formal Living

Formal Dining

Family room

Kitchen/Eat-in area

Master bedroom

Guest Room

Samanthas room

Thomas' room

The finished side of the basement


Hope you enjoy this little blog of mine and I am so excited to start sharing. Will be sharing my first Halloween project tomorrow! I made a pair of knock off pottery barn skull vases and they turned out so stinking cute!!