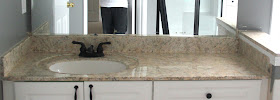
I Painted my countertops and lived to tell the tale ;)
Well first a quick apology for the LONG delay from the last post to this one! I had grand plans to blog while on our relaxing TN cabin in the mountains vacation,,,I did not however take into account that my computer wouldn't hold the connection to their internet long enough to even check facebook!!
I have seen quite a few painted countertop tutorials online and decided to try to tackle this project in our master bathroom.
Our countertops started out as basic builder sink/counter faux marble that seems to be ever so popular in these parts.
But ended up looking like this:
No really!! That's my actual painted counter top
I started by covering them with Kilz primer
This wasn't too scary because it didn't change the look all that much.
And then came the scary
You may want to cover your eyes if you frighten easily
No, really, cover up them eyes, maybe just peek through a few..
Using a sea sponge I dabbed on my first color, at this point I almost cried.
I thought I royally messed up trying this.
They looked absolutely horrid.
Hey I warned you :)
It's going to get worst before it gets better...
Now I know I warned you at the beginning, that was really just a courtesy to prepare you for the next picture so if you get even a wee bit squeamish at the sight of absolute ugliness, please scroll fast LOL
Uh, yeah, not much I can say, it was U-G-L-Y
I had to force the hubby to stay out for fear he'd run away and never return.
But I was not about to let these countertops beat me, oh no!! I was going to forge on and just keep on adding colors.
It really couldn't get worst
Right? I mean RIGHT?
Alas, my heartrate was starting to come down.
Adding the metallic paint seemed to help calm it down, but still wasn't 'there' yet
Went over with the lightest color to tone it all down
That's what I'm talking about!!
The hubby's side
Now to topcoat.
I used Envirotex Lite
Purchased at Michaels with 50% off coupons (used 2 boxes)
It's sooooo shiny!!!
And you can see I may have overdone it on the sparkles. Not so obvious in real life.
Thank goodness ;)
Here you can see how I covered up the cabinets to protect from the topcoat, not the easiest material to work with but definitely do-able even for a novice like me.
A close up of the 'granite' look
Not bad for about 36 bucks of material eh?
I'll admit the first, second and even third coat I sponged on had me a bit terrifed, I thought I had made a HUGE mistake taking this on but the end result is totally worth those gray hairs I grew freaking out stressing about it ;)
A quick look at what it looked like when we moved in
And after painting...
Bought new cabinet hardware and that made a huge impact as well for low cost.
I love how it turned out and can't wait to share the next project I tackled in here.
Framing the basic builder mirrors with no miter cuts!!
Linking up to some great parties:


